
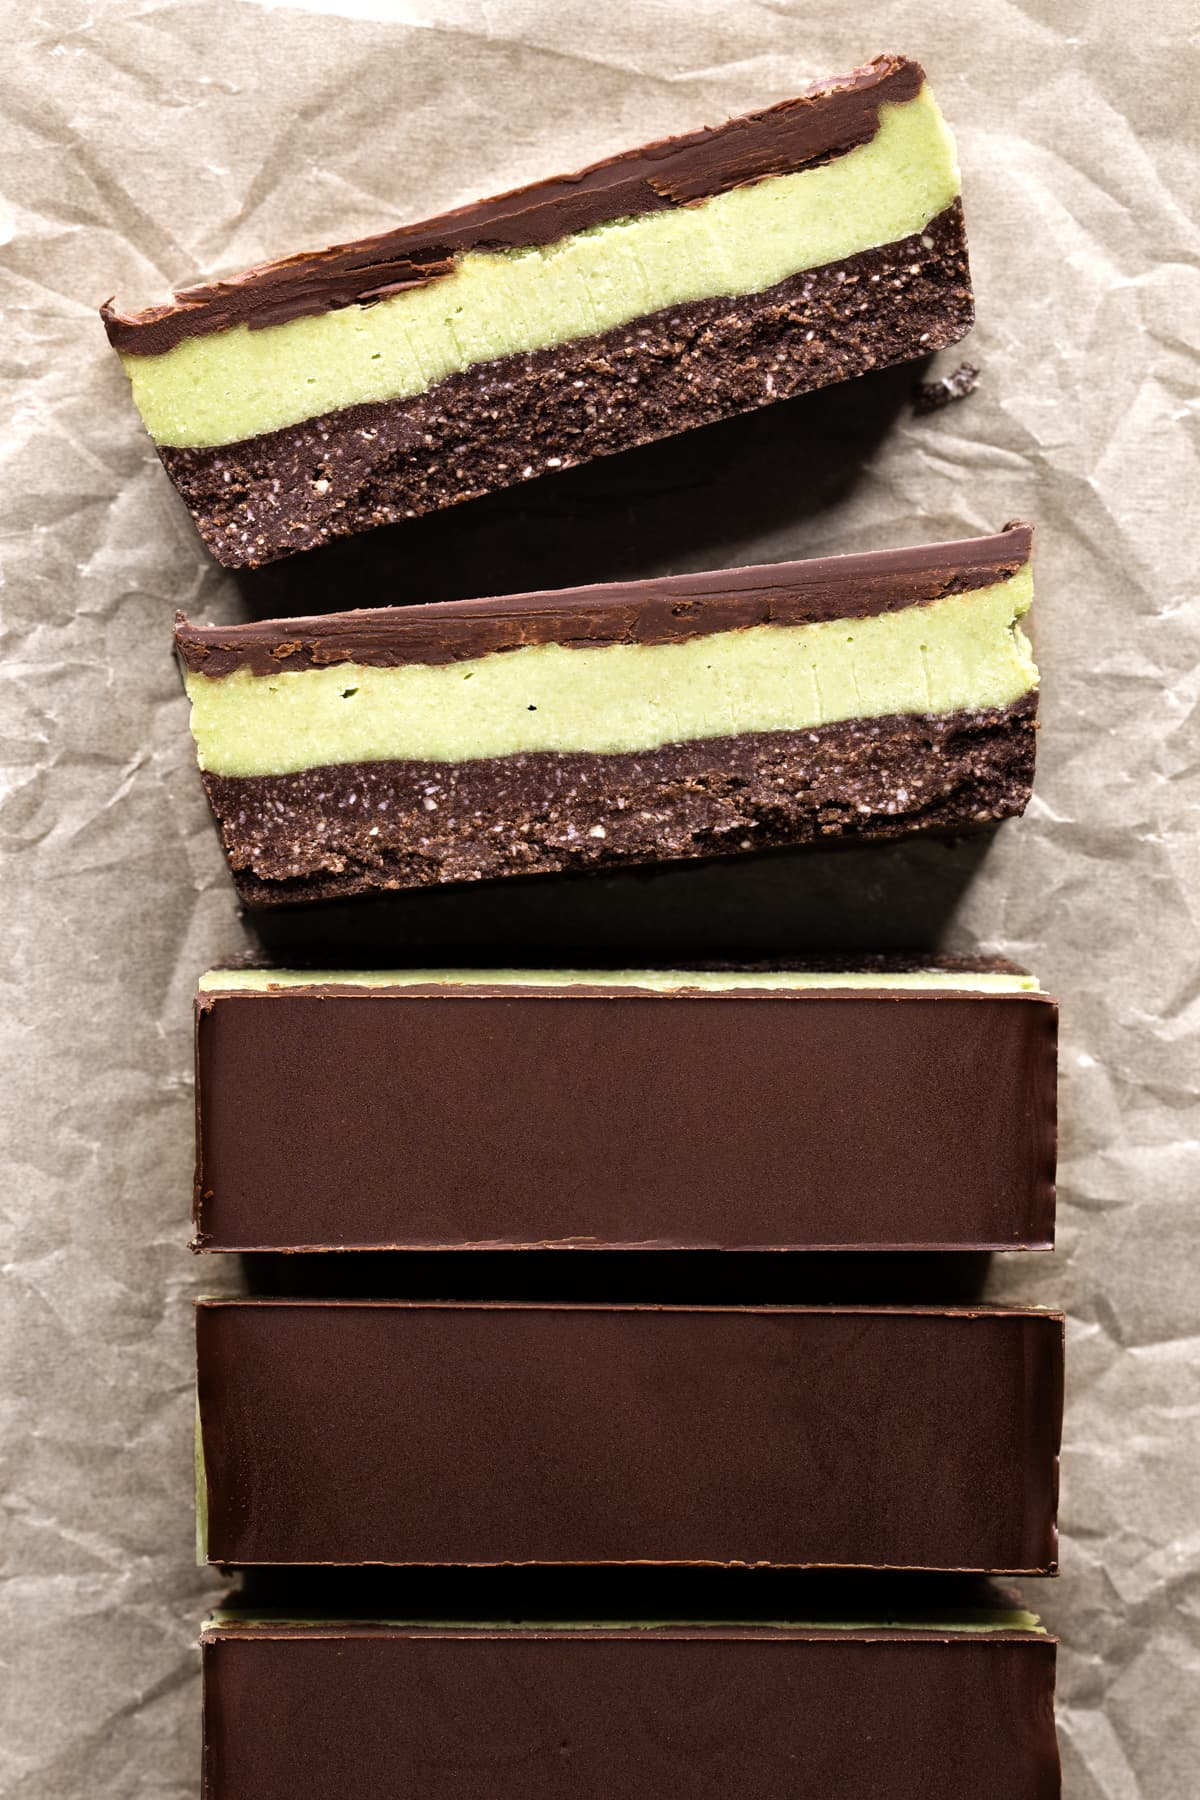
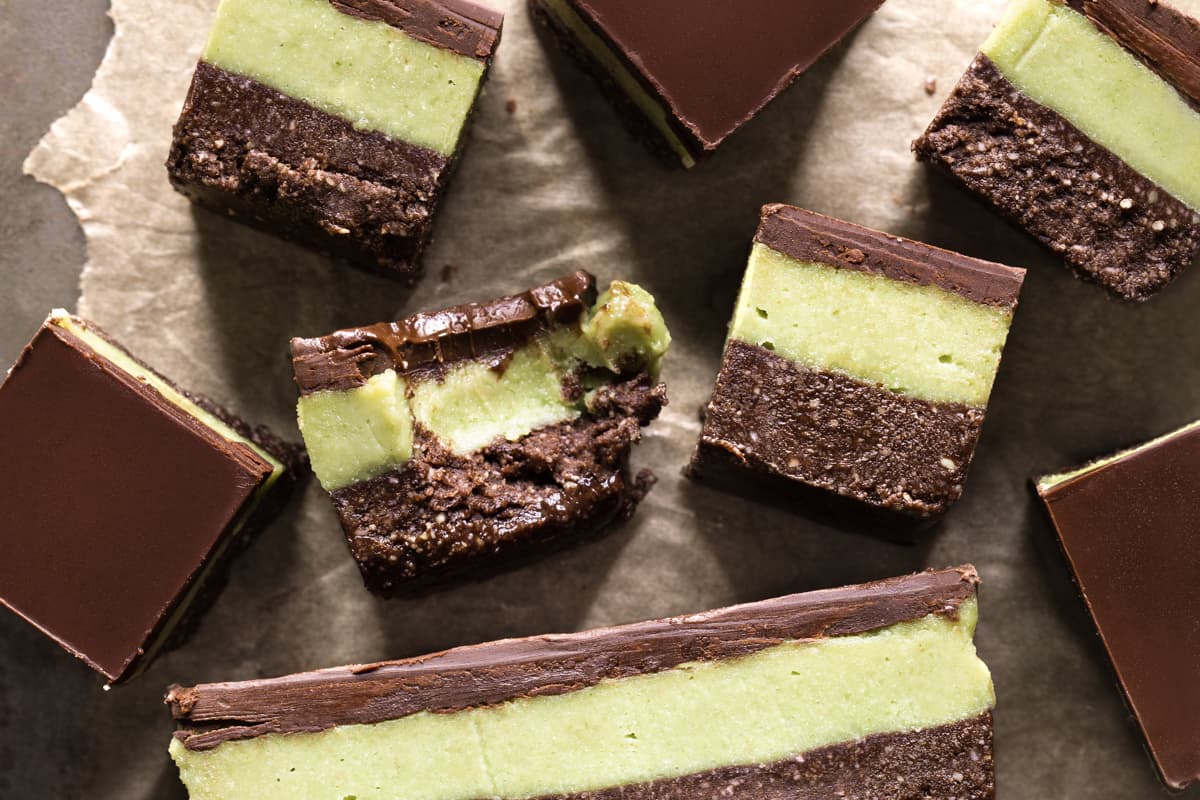
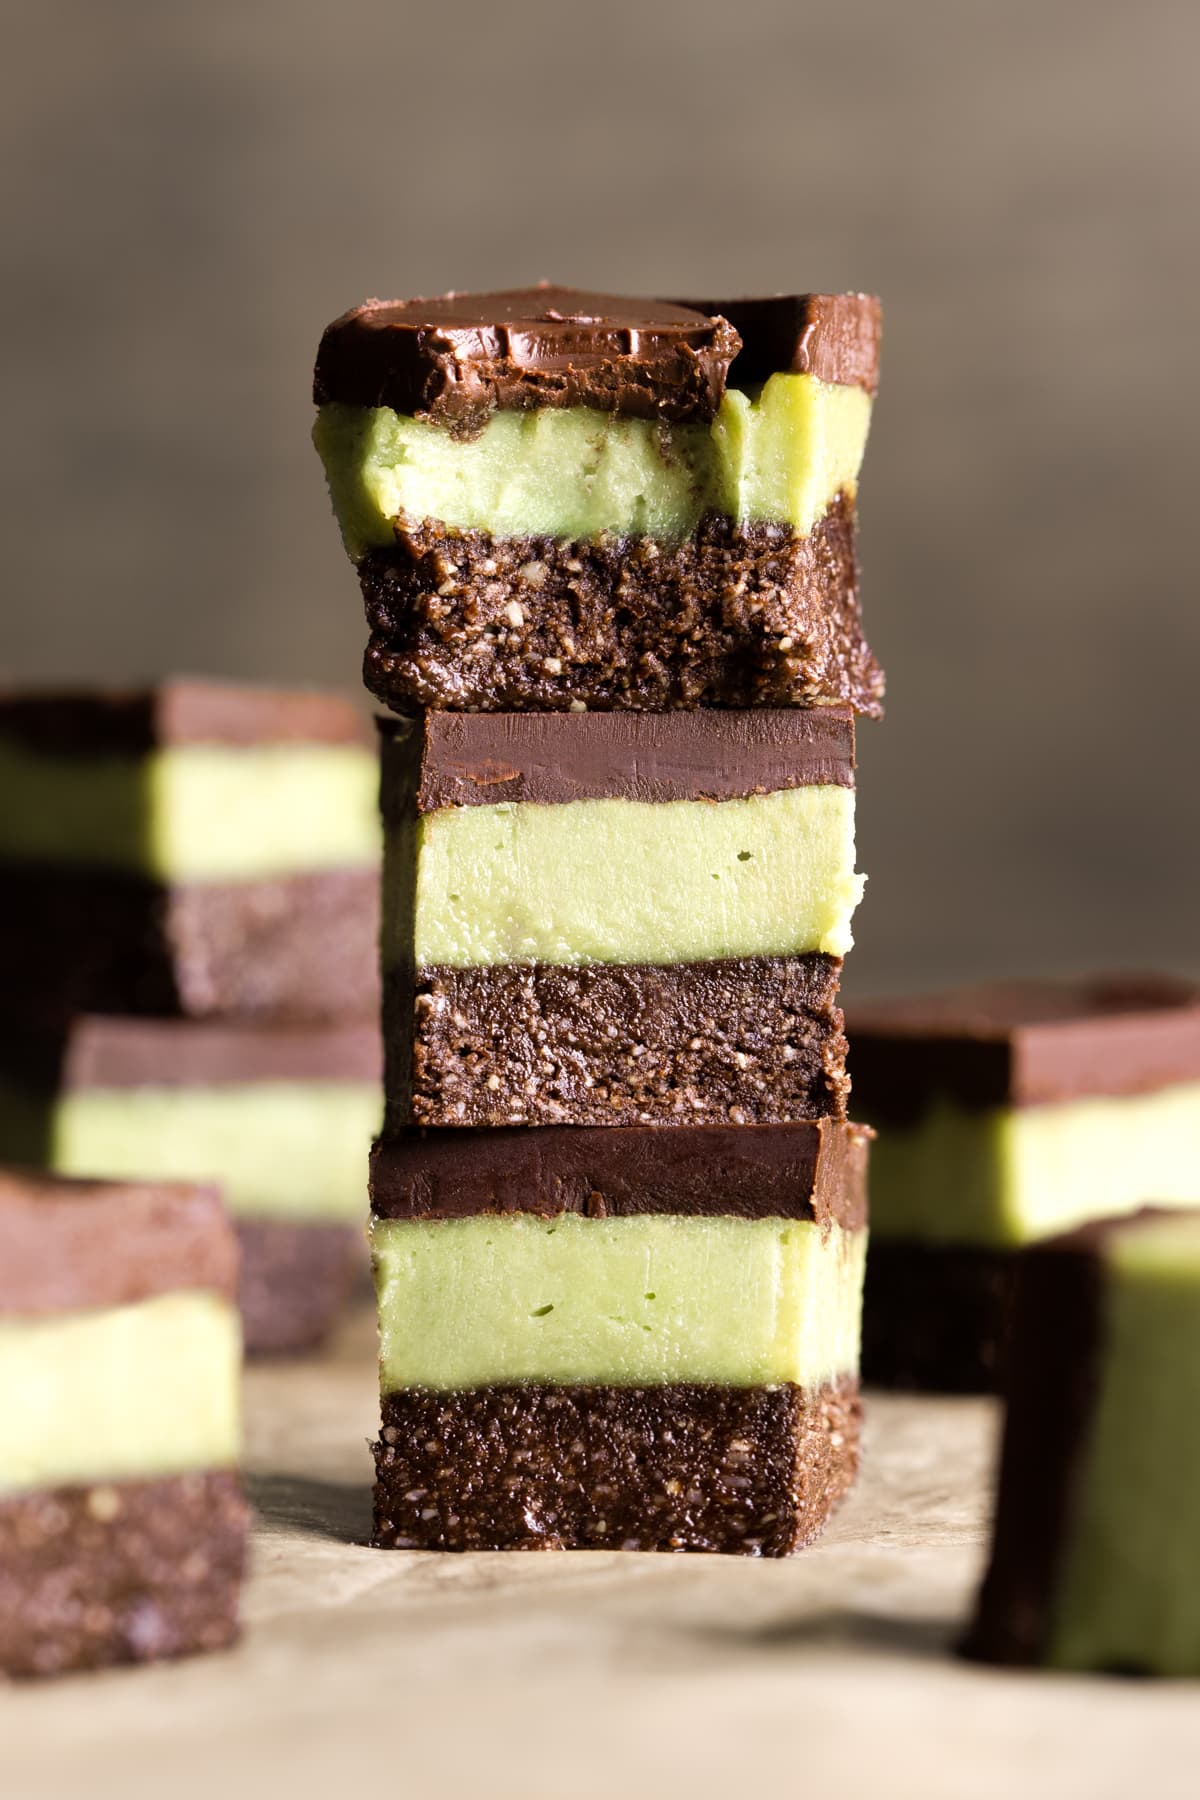
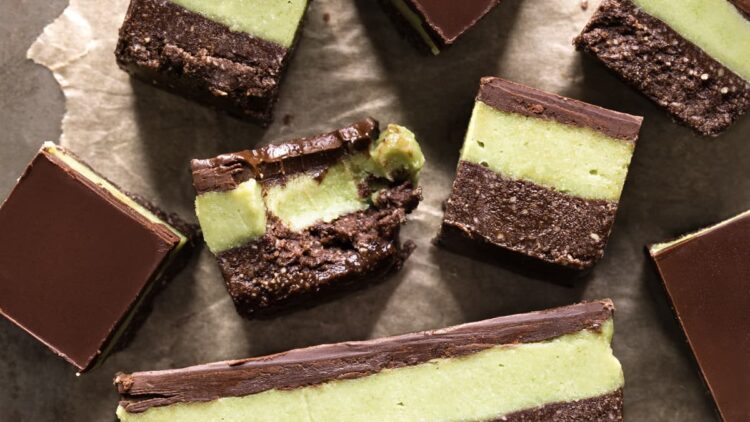
This Vegan No Bake Chocolate Mint Slice is a healthy version of classic peppermint slice. The chocolate biscuit base is gluten free and grain free, followed by a creamy mint filling and dark chocolate topping. Plus, a secret natural ingredient gives the mint filling its beautiful green color.
The slice is also easy to make with just a NutriBullet blender. Unlike many no-bake slice recipes, you won’t need a large, expensive food processor. The key to making things work in the NutriBullet is to blend the dry ingredients until they start to clump together. Then simply tip that mixture into a bowl and stir through your sticky sweetener and other liquid ingredients by hand.
Healthy peppermint slice
Unlike traditional peppermint slice, this healthy version is made with less-processed ingredients. Instead of using wheat flour, butter and copha, we make some clever swaps.
- Swap wheat flour for whole food ingredients: Wheat flour is normally found in the base of a mint slice recipe. Instead, this no-bake mint slice uses a blend of raw cashew nuts, coconut and cocoa powder. This keeps the slice gluten free and grain free. Since it is also a no-bake mint slice, coconut oil is added so that the base mixture sets firm once chilled.
- Use soaked cashew nuts instead of copha: Copha is a vegetable fat shortening made from hydrogenated coconut oil that is often used in the filling for mint slice. Instead, this recipe uses a combination of soaked cashew nuts and extra virgin coconut oil. After soaking the cashew nuts, they blend into a creamy paste. Then, the coconut oil helps the filling set firm after chilling.
What can I use instead of green food coloring
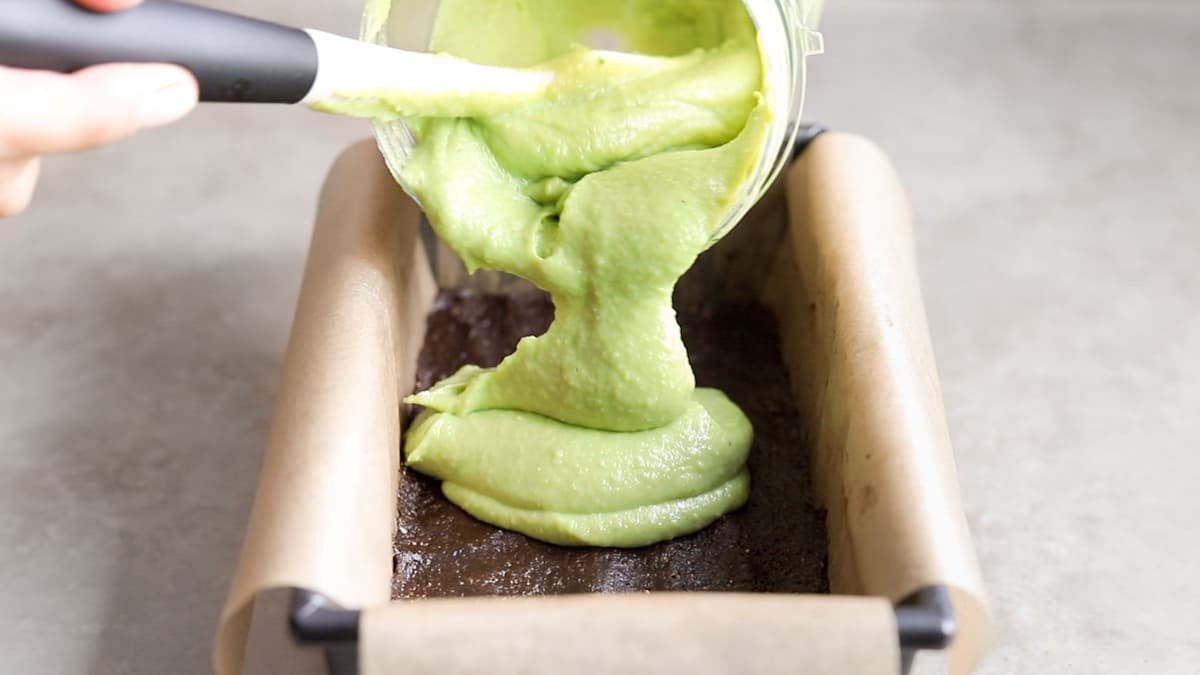
Baby spinach leaves can be used instead of green food coloring in this vegan chocolate mint slice recipe. The spinach blends into the mint filling mixture without a trace, save for providing a pretty, mint-green color. You won’t taste the spinach at all because you only need to use a small amount.
How many calories are in this mint slice
Each piece of this mint slice contains 229 calories and only 4.7 grams of sugar. Not bad for a dessert. Plus, it still tastes super indulgent with layers of rich and creamy chocolate and peppermint.
You can check out the full nutrition facts at the end of the recipe below.
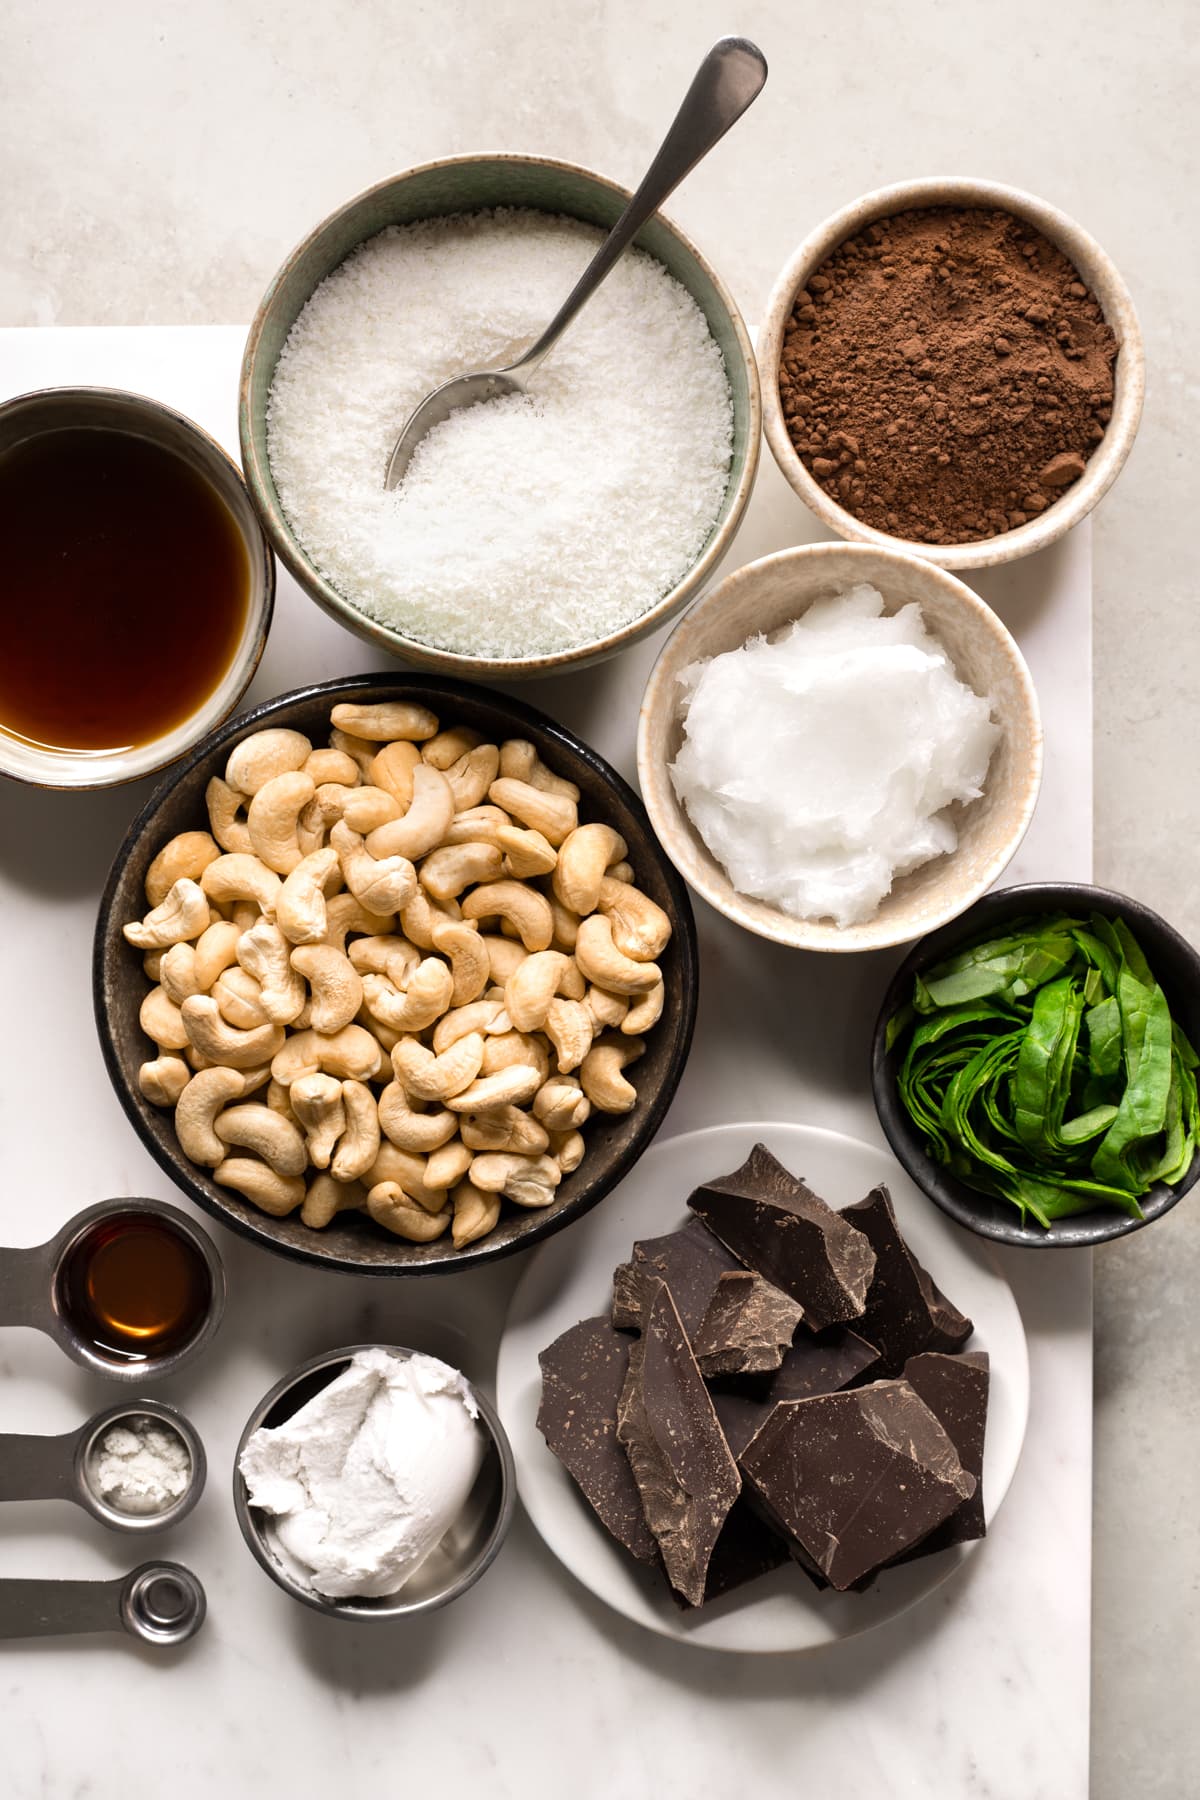
Ingredients for vegan no bake chocolate mint slice
- Cashew nuts – Raw and unsalted cashew nuts are best here. We use some of them in the base, and then soak some more to use in the mint filling.
- Unsweetened desiccated coconut – Blended into the base and also used in the filling. I buy my coconut from a bulk health food store, since that seems to be the only place where I can find coconut that doesn’t have added sulphites.
- Cocoa powder – To provide chocolate flavor in the base. I use regular baking cocoa in this recipe, but you can use raw cacao powder if you prefer.
- Coconut oil – Used throughout the slice to help it set firm once chilled. It also adds a subtle sweetness.
- Maple syrup – To sweeten the slice. Maple syrup is my preferred sweetener for the mint filling since its sweetness cuts through the cashew nuts, coconut oil and coconut cream nicely. However, I have often used brown rice syrup in the base instead of maple syrup.
- Coconut cream – Used in the mint filling to add extra creaminess. You will need to use the thick portion of a can of refrigerated coconut cream.
- Peppermint oil – To provide the mint flavor. If you don’t have food-grade peppermint oil, you can use peppermint extract or essence instead.
- Baby spinach – To color the mint filling green. I promise you won’t taste it. Otherwise feel free to leave it out, which will just mean the filling will be an off-white color due to the cashew nuts.
- Dark chocolate – Used in the chocolate topping. I like to use at least 70% cocoa chocolate to keep the sugar content down. But feel free to use any chocolate you like.
- Vanilla extract – Used in the base to add a hint of vanilla sweetness. If you don’t have any at home, you can leave it out and the slice will still taste great.
- Salt – Used in the base to enhance the flavors. I always think a pinch of salt is a good idea with chocolate.
How to store this chocolate mint slice
Store this vegan chocolate mint slice in an airtight container in the fridge for up to 2 days, or freeze it for up to 2 months. Storage time in the fridge is based on how long canned coconut cream will last in the fridge after opening.
When I make the slice, I store enough portions for 2 days in the fridge and freeze the remaining portions. That way, you can easily defrost individual portions of the slice in the fridge overnight as needed.
More no bake recipes
Recipe video
Watch the recipe video to see how to make Vegan No Bake Chocolate Mint Slice.
Vegan No Bake Chocolate Mint Slice Recipe
Recipe video above. This vegan no-bake chocolate mint slice is a healthier twist on the classic treat. It has a gluten-free and grain-free chocolate biscuit base, a creamy mint layer, and a dark chocolate topping. A natural secret ingredient makes the mint layer beautifully green.
- Serves: 18 pieces
- Prep time: 40 mins
- Cook time: 1 hour chilling
Ingredients
For the base
- 3/4 cup (107 g) raw cashew nuts
- 3/4 cup (70 g) unsweetened desiccated coconut
- 3 tbsp (21 g) cocoa powder
- 1/8 tsp fine salt
- 3 tbsp (42 g) coconut oil, softened
- 3 tbsp (60 g) maple syrup
- 1 1/2 tsp vanilla extract
For the mint filling
- 1 cup (143 g) raw cashew nuts
- 8 tsp (30 g) thick portion refrigerated coconut cream (see Note 1)
- 1/4 cup (54 g) coconut oil, melted
- 2 tbsp (12 g) unsweetened desiccated coconut
- 2 tbsp (40 g) maple syrup
- 5 to 15 drops food-grade peppermint oil (or peppermint extract – see Note 2)
- 1/3 cup (12 g) baby spinach leaves, for green color
For the topping
- 3.5 oz (100 g) dark chocolate
- 8 tsp (38 g) coconut oil
Instructions
- Soak cashews
Place the cashew nuts for the mint filling in a bowl and cover with boiling water. Allow to soak for 1 hour (see Note 3).

- Prepare base
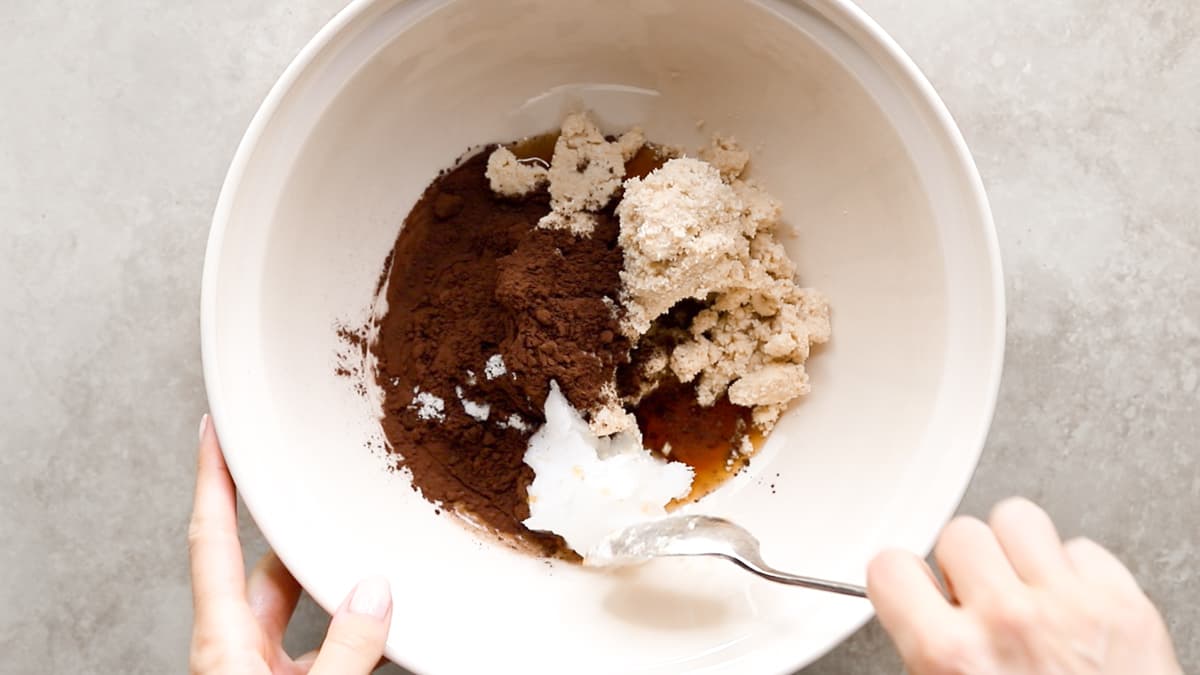
While the cashew nuts are soaking, prepare the base by blending the cashew nuts for the base and the desiccated coconut in a blender until the mixture starts to clump together. Tip the mixture into a bowl add the remaining base ingredients. Stir until well combined (see Note 4).
- Line and chill
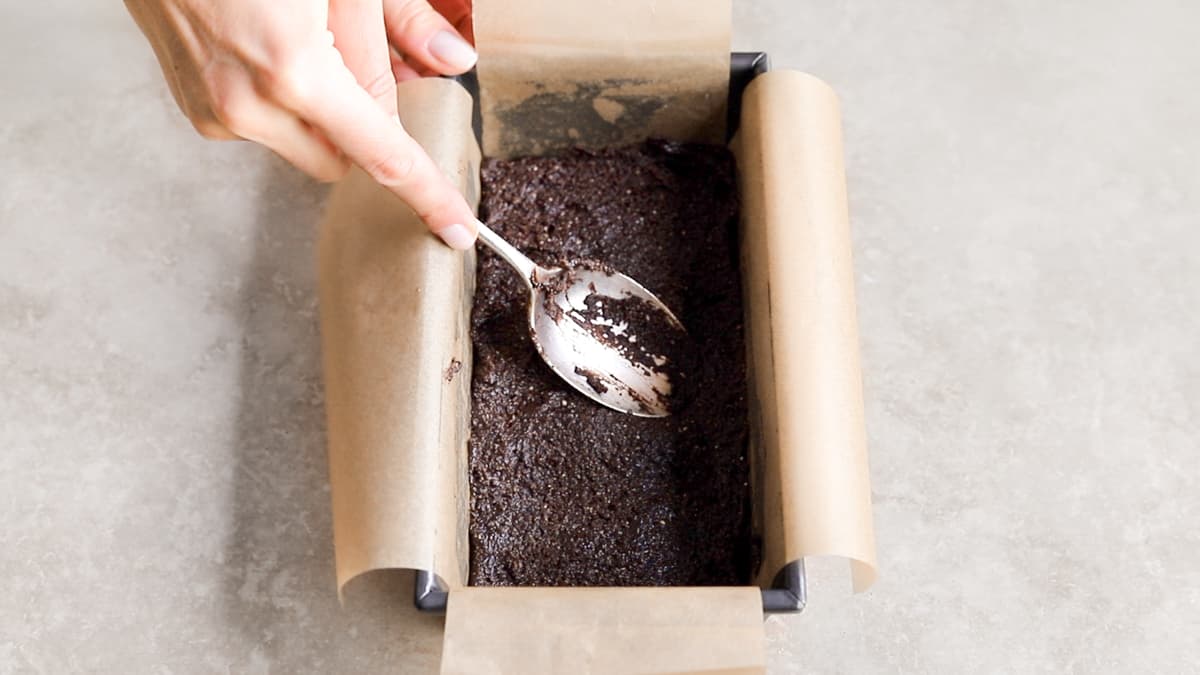
Line a 4×8 inch (10×20 cm) loaf pan with baking paper (see Note 5). Tip the base mixture into the pan, pressing it out evenly with the back of a spoon. Set aside in the freezer to chill.
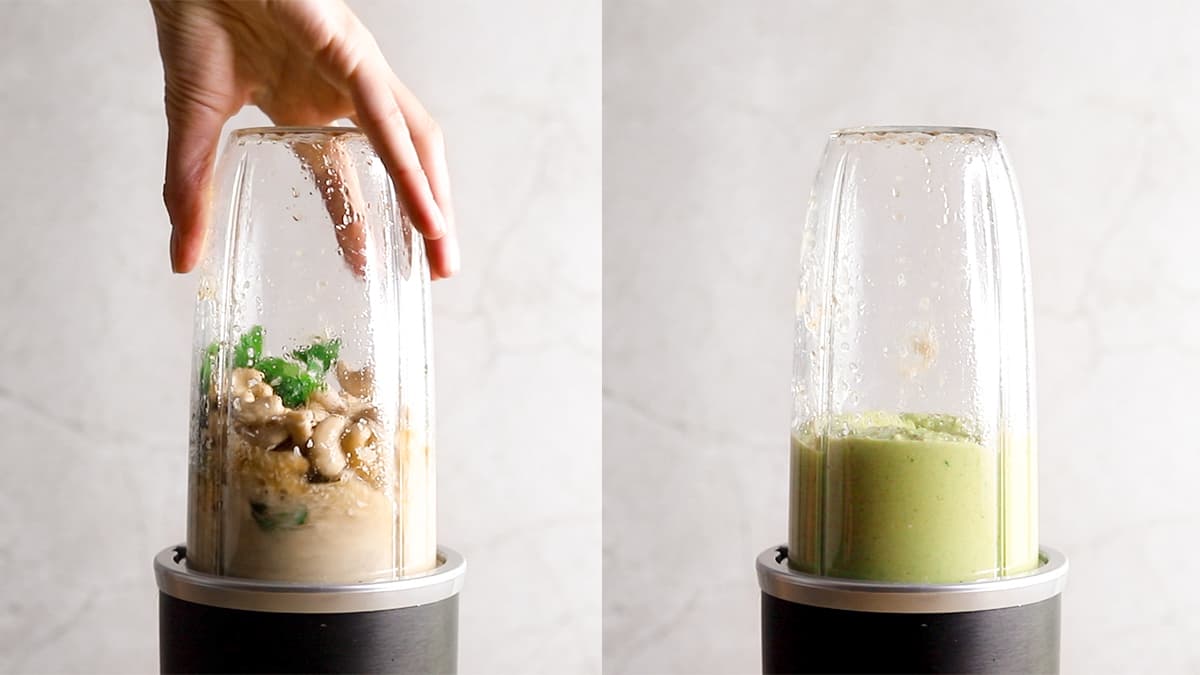
- Blend mint filling
Once the cashew nuts have finished soaking, drain them well, then place in a blender or food processor with the remaining mint filling ingredients. Blend until smooth. Taste and add more peppermint if desired.
- Spread filling
Tip the mint filling onto the base and smooth it out evenly with the back of a spoon. Return to the freezer to chill.
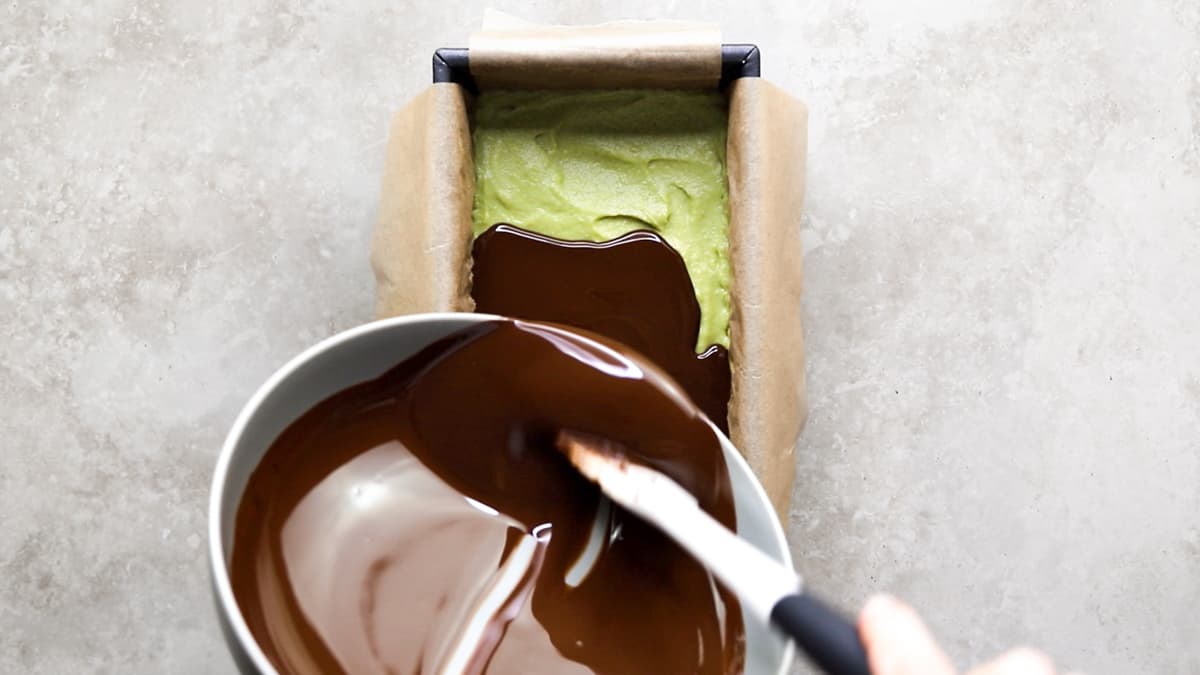
- Make chocolate topping
Make the topping by melting the chocolate in the microwave or using a double boiler. Stir in the coconut oil until you get a smooth mixture. Pour the mixture over the mint filling, using the back of a spoon to ensure that it’s evenly covering the slice. Chill in the freezer for 1 hour or until the mint filling is firm and the chocolate topping is set.
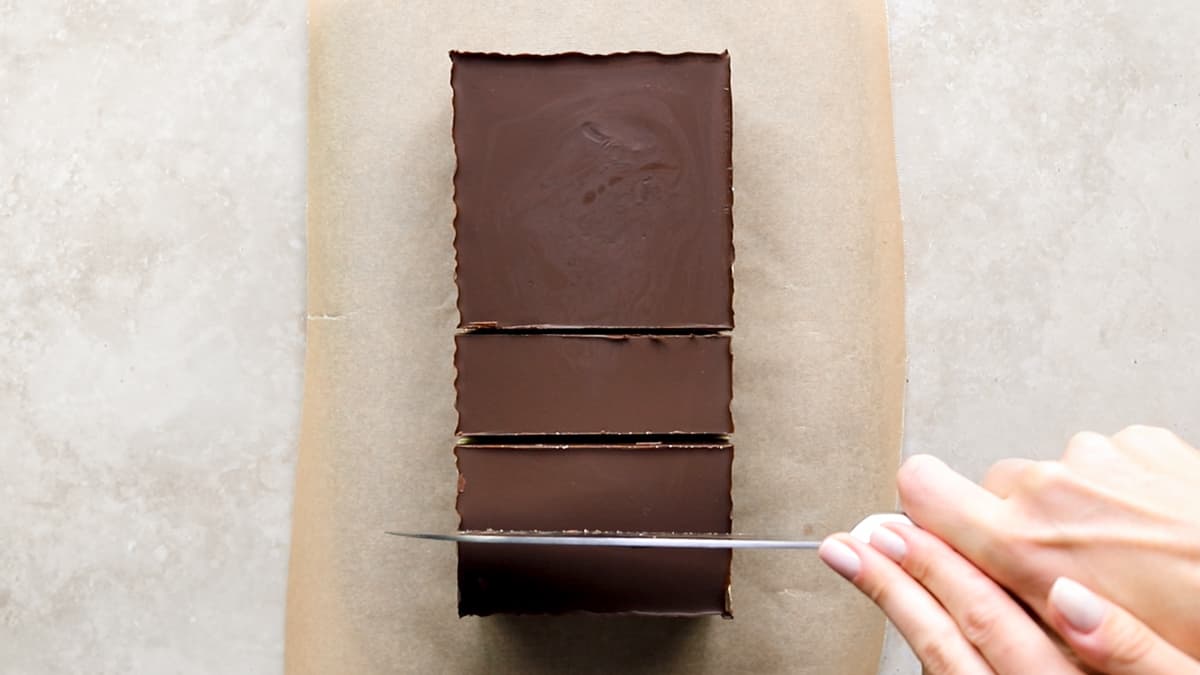
- Cut and serve
Once firm, cut into pieces. You can let the slice sit at room temperature for 10 minutes to soften slightly before cutting.

Notes
- Refrigerated coconut cream – Refrigerate a can of coconut cream overnight so the thick portion rises to the top of the can and the watery part stays on the bottom. When ready to use, open the can and scoop out the thick portion only to use in the recipe.
- Peppermint oil – Make sure your peppermint oil is food-grade and suitable for ingestion, meaning you can eat it. I use Obbekjaers Pure Peppermint Oil, which doesn’t have a harsh menthol taste that some brands have. I recommend starting with 5 or 6 drops, then tasting the filling once blended and stir in more if you want. I usually end up using 15 drops of the Obbekjaers oil, because I like it quite minty. You can also use peppermint extract as a substitute. I would start with 1 teaspoon of extract, then stir in more as needed to suit your taste.
- Soaking the nuts – Soaking the cashew nuts in boiling water speeds up the softening process. One hour is best, but I have also made this recipe after only soaking the nuts for 15 minutes when I was in a rush. I just had to add a small splash of water when blending the filling to compensate. Alternatively, you can soak the nuts overnight in the fridge.
- Blender vs food processor – The method above is how I make this recipe using my NutriBullet blender. I mix in the sticky ingredients by hand, since blenders usually can’t handle thick and sticky mixtures. If you have a high powered food processor, you can blend all base ingredients together at once.
- Lining your pan – I line my pan with two strips of baking paper that criss-cross when placed in the pan with some overhang. This way, you can easily lift the slice out of the pan once chilled. I also grease the pan with some coconut oil so the baking paper stays in place.
- Storage – Store the slice in an airtight container in the fridge for 2 days, or freeze for up to 2 months. The short storage time in the fridge is due to the canned coconut cream. Once opened, my cans of coconut cream say the cream will only keep for 2 days in the fridge. The slice freezes really well though, so I freeze what I won’t eat in 2 days and defrost in the fridge overnight as needed.
This is very yummy. The consistency of the mint filling for me was quite soft and I struggled to cut it cleanly even after chilling it in the freezer.
Thanks Charlie, sorry to hear the mint filling was quite soft for you – did it look thick like it does in the recipe video when you spread it onto the slice before chilling?
These sound delicious. Do you think just the base would also work to convert into bliss balls?
You could certainly use the base mixture to make bliss balls 🙂 The mixture is quite soft when first mixed, so if you were having trouble rolling it into balls, you could let it chill briefly in the fridge to firm up slightly.
Worked until I got to the end, I didn’t let it sit enough that when I cut it, the chocolate on top started breaking, so it looks messy but it still tastes good
Yeah, letting it sit at room temperature before cutting will allow for a clean cut!
Hi Lilian,
Great recipe! It leaves me craving one of your old cookie recipes which is no longer on the site but I’m dying to make again – from the top of my head I remember it had chia seeds, nut butters, desiccated coconut, rice malt syrup, coconut oil etc. I believe it required a short bake time. It was amazing and I can’t recall the recipe details for the life of me, not sure if it’s one you’d share again? Would be amazing! Thanks
Hi Anya, thank you! Sorry the recipe isn’t on the site anymore – was it the Nutty Protein Cookies or the Chocolate Protein Cookies? They had all the ingredients you listed! The Nutty version also had chopped almonds, sunflower seeds and ground flaxseed and the Chocolate version had cashew nuts and raw cacao powder. If either of those sounds familiar, I can post the recipe here in the comments or email it to you 🙂
These are the best Raw Chocolate Mint Slices ever!!!! Absolutely delicious!! Thank you so much for sharing this recipe Lilian! 🙂
Thanks Abi! I’m so happy you enjoyed the recipe 🙂